How to put on your wig
Maybe you bought a wig online, or worse, you bought it in a wig shop and you didn’t get the personal attention you needed to successfully wear it after you got home.
Below are detailed steps and a few tips and tricks to help you out. Be sure to check check out my post on how to secure your wig.
First things first, if you have your own hair you need to get it out of the way. Most of the time this will be accomplished by using clips and hair ties. If your hair is short, but still long enough that is needs to be pulled out of the way then clips can be hard to use. If the hair is put into a pony tail you need to be careful about a bump in the back. Using a velvet wig grip (below) can help with these issues. Also a nylon wig cap may help.

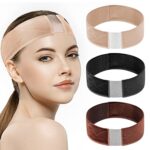
Another way to get your hair out of the way is to use a velvet wig grip. Essentially it’s a piece of velvet that has velcro to snug it around your head. It pretty much acts like a big piece of velcro which sticks to your hair on one side and your wig on the other. When put on correctly (learning curve here) nothing is going slip and slide off! One of the cons is that it adds an extra layer of pressure on your head and extra warmth…maybe a good thing in the cold winter months in New England!
Using a Wig Grip
Tip: Before putting your wig on be sure it is free of tangles, this will make it easier to style once it’s on.
The next step is one that tends to be difficult to grasp but is really very simple, and necessary to wear your wig properly.
There are 2 firm pieces on each side with a 1 inch long piece of metal in it. These are called ear tabs and are there to keep your wigs centered and flat to your head. The metal pieces need to be straight or curving slightly toward your face. Be sure they are not bending outward or you’re going to look like the Flying Nun!
Tip: If the ear tabs are properly bent before you put your wig on then they should be correct after you get it on.
Make sure your wig is on straight

Ok, the moment is here! Lets put it on!
Hold your wig in front of you with the tag on top and the front on the bottom. You’re going to grip the edge of the wig on both sides near the tag. Bend over and put the front of the wig lower than your eyebrows. The bend in the structure of your face is going to hold the wig in place as you put it on. Now, flip it over and stretch it over your head ….Tip: be sure that you don’t catch it on a ponytail or any clips as you bring it over. Slowly move the wig back to just below your natural hair line. Tip: you want to avoid pushing too far back and bringing it forward…it will mess up the work you did clipping it out of the way.
Now find those firm, little, ear tabs. They should be in front of each of your ears. Hold on to them and make sure they are equal distance on the sides of your face, shift it as needed. Do a final check and make sure that your wig is pulled down all the way in the back, cover any band or cap you may have on, ear tabs are even, and the front is sitting just in front of you’re hairline.
Fluff it, smooth it, style it…you’re ready to go!
Check out my post on how to secure your wig to prevent it from slipping and potentially coming off (at the very worst time!).
Putting your wig on...Finally!